This post is intended to expand on the previous post Installing Python on Windows and Connecting it to MongoDB . In this post we will use the virtualenv and extract data from MongoDB and process it using Python’s Natural Language Tool Kit (NLTK).
The awesome book from which the NLP techniques are adapted is called “Mining the Social Web: Analyzing Data from Facebook, Twitter, LinkedIn, and Other Social Media Sites” by Mathew Russell.
This post assumes you have already gone through the following posts
- Installing Python on Windows and Connecting it to MongoDB
- Python in Eclipse with PyDev
- MongoDB and PHP
- Some data stored in the MongoDB of the form array( “id”, “date”, “title”, “description”)
1) Activate the virtualenv
In a Command prompt, navigate to PlayPyNLP. Then type
Scripts\activate
The command prompt should now be preceeded by (PlayPyNLP) which means you are using a virtualenv
2) Install the necessary packages
Use the commands below to install the packages required to perform some basic text mining. The package “nltk” is Python’s Natural Language Toolkit and comes with an amazing amount of built in functionality that can really make you look good. The package pymongo is required to attach Python to the MongoDB that we are using to store our data.
easy_install nltk
easy_install pymongo
Note that the System PYTHONPATH needs to be able to find these installed packages in Eclipse. Because we are using the virtualenv in Python this can get a bit dicey. If this isn’t working for you check out the Things that go wrong section at the bottom of the post to try and resolve it.
3) Install the Stopwords Corpus
To install a corpus, go to a Command prompt and activate the virtualenv that you want to use. For this exercise I will type
cd “C:\Documents and Settings\Chris\workspace\PlayPyNLP”
Scriptsactivate
python (this opens up the Python interpreter)
In the Python Interpreter
>>> import nltk
>>> nltk.download(‘stopwords’) (this downloads the stopwords executable)
4) Run a Script
The script that I’m executing is available in a github repository. If all the subsequent steps went well this should be working for you too.
term_frequency_inverse_document_frequency_from_mongodb.py
5) Review the Results
In the term_frequency_inverse_document_frequency_from_mongodb.py script we are computing the TF-IDF values for the word “running” for each of 10 documents stored in MongoDB. In my case, the 10 documents are descriptions associated with Apps in the Google Play store. Note that “MapMyRun GPS Running” doesn’t have the word running in the description even once, in spite of the fact that the word appears in the title.
TF-IDF(Angry Gran Run – Running Game): running 0.0207312466324
TF-IDF(Free Running): running 0.0210886819192
TF-IDF(MapMyRun GPS Running): running 0.0
TF-IDF(Nike+ Running): running 0.0136816952049
TF-IDF(Panda Run): running 0.00627253103238
TF-IDF(RunKeeper – GPS Track Run Walk): running 0.00384636336891
TF-IDF(Running Fred): running 0.0136919054252
TF-IDF(Temple Run): running 0.0127410786595
TF-IDF(Temple Run: Brave): running 0.0238274717788
TF-IDF(runtastic): running 0.0
Things that go wrong
1) ImportError: No module named nltk
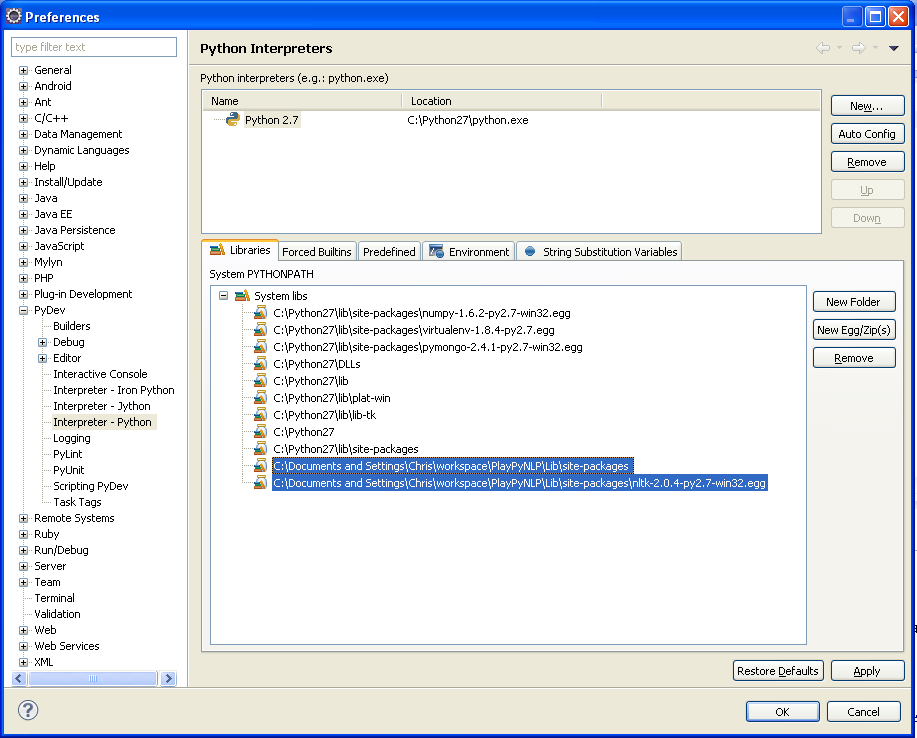
I struggled with this one for quite a while. It turns out the problem was 1) my Sytstem PYTHON path setting was wrong because I was using the virtualenv , and 2) when it was correct Eclipse didn’t realize it.
In order to correct the issue, I had to add the location of the virtualenv to the System PYTHONPATH
Window -> Preferences -> PyDev -> Interpretet Python -> Libraries
Click New Folder and add paths to the virtualenv “site-packages”. Also add another New Folder that points at the egg directory for NLTK.
This will need to be repeated for other modules as well like BeautifulSoup.


google…
Google http://www.google.com…