This post is going to cover how to make a nice looking android screenshot graphic asset for the Google Playstore. We’ll use GIMP for this, because it’s free, and it’s awesome.
First off, open GIMP and select
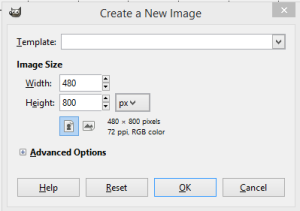
File -> New. The best size for the screenshot is 480×800, so go ahead and enter that. Click OK.
Get the Toolbox to show up with CTRL+B
Next we’ll setup a nice colored background with the Blend Tool. Set the Foreground and Background colors to something awesome.
The Blend Tool icon looks like a gray square with a gradient on it.
Now make a selection across the layer. The start point will be the Foreground color and the end point will be the Background color. The gradient (blend) direction will follow the direction of the start and end points.
OK, now there is a great background that is sized just the way we need. Next up we’ll grab the phone picture. I’m assuming that you already have the screenshots.
Navigate to the super awesome ShapeItApp.
Near the top of the page is a button that says “Upload Your Screenshot”. Go ahead and follow the instruction of the button and upload the screenshot.
Next, pick one of the phones. It will show up in the template on the right with the screenshot embedded. Do a right-click “Save Image As…” on the image and save it somewhere you can find it. Note that copying it isn’t as good because GIMP wont treat it as its own layer.
Switch back to GIMP and do Edit -> Open As Layers.
Click the Scale Tool in the Toolbar, then left click on the image of the phone. Make sure that the Width and Height are linked, and change the width to 500. Click ‘Scale’ to save the adjustment.
Use the Move Tool to place the phone image so the bottom edge of the screen is right at the bottom edge of the canvas.
In the menu Tools -> Transform Tools -> Align . Click the image of the phone and then click the ‘Align center of target’.
Now for the text. Click the ‘Text Tool’ in the Toolbar, and click near the top of the image. Type in the main title.
Hit CTRL+A to select all the text you just typed.
Change the size and font of the selected text in the Text Toolbar. I like Arial 40. Also, change the color in the Text Toolbar to something snappy.
Now to align the text. Go to Tools -> Transform Tools -> Align, click the text, and click the button ‘Align center of target’.
Repeat for the subtitle.
That’s it! Make sure and save your project.
To save the PNG go File -> Export To . Then give it a name that ends in .png and Export the file.

![2015-01-31 14_08_16-[Untitled]-38.0 (RGB color, 1 layer) 480x800 – GIMP](http://texploring.com/wp-content/uploads/2015/01/2015-01-31-14_08_16-Untitled-38.0-RGB-color-1-layer-480x800-–-GIMP-300x219.png)
![2015-01-31 14_11_44-_[Untitled]-38.0 (RGB color, 1 layer) 480x800 – GIMP](http://texploring.com/wp-content/uploads/2015/01/2015-01-31-14_11_44-_Untitled-38.0-RGB-color-1-layer-480x800-–-GIMP.png)
![2015-01-31 14_13_59-_[Untitled]-38.0 (RGB color, 1 layer) 480x800 – GIMP](http://texploring.com/wp-content/uploads/2015/01/2015-01-31-14_13_59-_Untitled-38.0-RGB-color-1-layer-480x800-–-GIMP-300x91.png)
![2015-01-31 14_40_37-_[Untitled]-38.0 (RGB color, 2 layers) 480x800 – GIMP](http://texploring.com/wp-content/uploads/2015/01/2015-01-31-14_40_37-_Untitled-38.0-RGB-color-2-layers-480x800-–-GIMP-168x300.png)
![2015-01-31 14_42_28-_[Untitled]-38.0 (RGB color, 2 layers) 480x800 – GIMP](http://texploring.com/wp-content/uploads/2015/01/2015-01-31-14_42_28-_Untitled-38.0-RGB-color-2-layers-480x800-–-GIMP-300x235.png)
![2015-01-31 15_05_36-_[Untitled]-38.0 (RGB color, 2 layers) 480x800 – GIMP](http://texploring.com/wp-content/uploads/2015/01/2015-01-31-15_05_36-_Untitled-38.0-RGB-color-2-layers-480x800-–-GIMP-180x300.png)

Speak Your Mind