One task that I seem to do quite regularly is migrating WordPress installations, especially between a live server and a localhost.
1) Download and Configure an FTP Client
First we need to copy all the files from the live site down to the localhost. There is no better way to do this than FileZilla.
There is a FileZilla client that comes with XAMPP, but I like the one I can download independently better. Go to the link below and pick your favorite platform. Note that we require a client install, not a server install.
http://filezilla-project.org/download.php?type=client
Follow the installation instructions for the FTP client.
Once we have the FTP client installed, launch it. Go to File -> Site Manager .
Click New Site and give it the name of your WordPress site (or whatever you want).
I have been using Bluehost lately, so as an example, to find the FTP connection information in Bluehost go to CPanel-> FTP Accounts. We could create an FTP account specifically for use with FileZilla (like I usually do), or just use the main ftp account. Note that if you click on Configure FTP Client for an FTP Account you’ll see the “FTP server” that you need for FileZilla. The Path should point to public_html, otherwise you wont be able to copy over the whole WordPress directory in one step.
Now we need to fill in the FTP connection information for your live site. Use the information gleaned from you web server and populate the:
- Host
- User
- Password
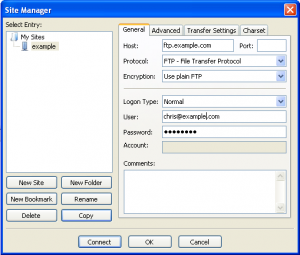
We should now be able to click the Connect button and get connected to the live site (Remote site).
2) Copy All the Files
Now that we are FTP connected to live site, we are ready to copy all of the files over.
First, navigate your Local site on the left to your webserver directory. Since I’m using XAMPP I will navigate to the directory:
C:\XAMPP\htdocs
Now simply click and drag your main folder from the Live site to the Local site and place it inside the htdocs folder.
This may take a few minutes as WordPress is quite big and the connection may not be lightening fast.
3) Configure the wp-config.php file
On the Local site, pull up the file wp-config.php in a text editor. This file is located in the top-level of the WordPress installation. For me this is:
C:\XAMPP\htdocs\example\wp-config.php
There are 2 lines I had to edit and 2 other lines that are noteworthy.
- define(‘DB_USER’, ‘root’);
- define(‘DB_PASSWORD’, ”);
The DB_USER should be set to a username in the local MySQL that has read and write privileges. I just use root when it’s on my localhost because I’m not concerned about hacking myself. Likewise, the DB_PASSWORD is the password that belongs to that particular DB_USER. I’m leaving it blank because I don’t have a password on my local machine MySQL. When we FTP files from the Local site to the Live site we need to make sure and not copy over the wp-config.php file because the live server database may not have the same username and password as that setup locally.
The other 2 lines to be aware of are:
- define(‘DB_NAME’, ‘some_database’);
- define(‘DB_HOST’, ‘localhost’);
The DB_NAME needs to be mapped to the database which contains the WordPress data. In our case we’re going to use the same name in the localhost database so we don’t need to modify this field.
The DB_HOST is the host of the database. In my case it was called localhost on my Bluehost server, so I don’t need to change this.
4) Export the MySQL Database From the Live Site
In order to export the database from the live site we need to log into our host. In my case this is Bluehost.
For Bluehost, go to the cPanel and find phpMyAdmin under Databases. Most everybody uses phpMyAdmin, so if you have a server other than Bluehost just track it down.
Click on phpMyAdmin and login. The login for phpMyAdmin may be different than the login for your host.
Now we need to select the database we want to export. There is a list of databases on the left. Find the one that corresponds to your WordPress installation.
Note: if you are having trouble figuring out which is which because Bluehost names everything wp_wrdX take a look at the post_title column in wp_posts table.
When you are properly focused on the correct database you should see
localhost -> some_database
![]()
If you are at a lower level of the hierarchy than that the export wont get everything.
Now click on the Export button. All the defaults should be fine so just click Go
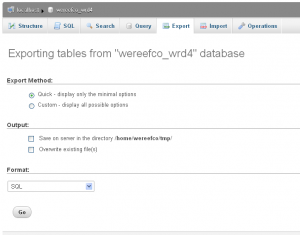
This will create a file with a .sql extension. Keep track of where this file got written because we will be importing it in the next step.
5) Import the MySQL Database on the Local Site
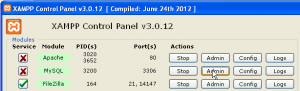
Now we need to access phpMyAdmin on our local machine. I always get there through the XAMPP GUI by clicking on Admin next to MySQL.
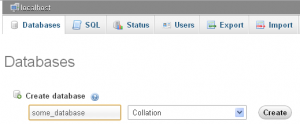
Next we are going to create a new database with the same name as the old one (some_database above).
Go to the Database tab and under where it says Create database type the name of our database and click the Create button.
Click on the newly created database in the list on the left. We are now focused on some_database.
Now click the Import tab. Choose the file we generated in Step 4 that has the .sql extension. Click Go. If everything worked we will see a message at the top of the screen “Import has been successfully finished . . .”.
6) Configure the MySQL Database on the Local Site
Now we need to configure the database so it is looking at the local site rather than the live site.
Go to the Structure tab and click on the wp_options table.
Find the field with option_name = siteurl. Change the option_value to the location of the files on your webserver. In my case this is
http://localhost/example
Next, find the field with option_name = home. Change the option_value to the same as your siteurl.
… and with that you should have a fully functioning site on your localhost that is basically the same as the one on your live site. Remember that the sites aren’t synced, so if you create new posts that you want to get to the sister site you’ll need to export/import the tables again.
Things That Go Wrong

Speak Your Mind